But, it did.
One minute, I'm preparing to paint wood panel walls white, the next I'm ripping up metal stair treads and old cracked yellow linoleum. So much for making a plan and sticking to it!
In my experience, that's the thing with any home renovation or room make-over, things come up and plans change. Sometimes, just cleaning an area on my wall will end in my doing touch-up painting around the house!
This was never more the case than when I walked down the basement stairs to begin my next big renovation and hurt my foot on the corner of the metal treads. That was it, The Basement Job was going to have to wait. The nasty ass basement stairs had to be sorted out first.
Short Story: After ripping up the metal treads and gross linoleum, I found layers of glue, dirt, strange fuzz and who knows what else. It took about 5 minutes of sanding and stripping before I threw in the towel. Filling my basement with dust, possibly laced with asbestos, was not worth it for six basement stairs. And while I am one to bust ass to make it right, these stairs didn't need to be "right" they needed to be clean, functional and free from evil treads. So, I opted to paint them.
The first coat was white. While it was an improvement, I thought the white made the stairs stick out like a sore thumb.
Looking at the fresh blank canvas of stairs, it hit me, I needed to paint a faux runner, just like one I saw on Pinterest.
I'm not quite sure where I got the idea for the Glow-in-the-dark (GITD) paint, but the next thing I know, I'm buying Khaki paint and clear GITD acrylic craft paint.
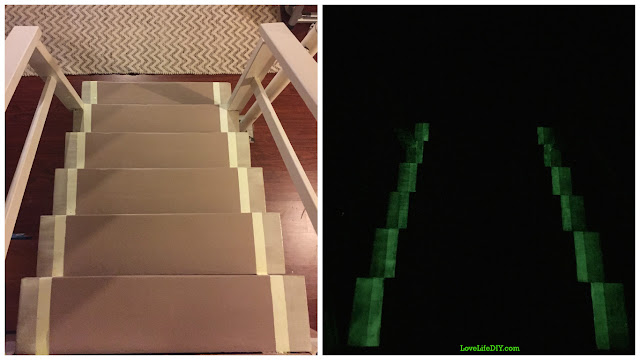
I ran home, taped off the stairs, using the 'Stair Stringer' or stair frame as a guide. I knew that was where I wanted the GITD paint.
At first.
NOTE: This photo was taken before I started to test a strip to make sure my evil plan would work. TIP: If possible, ALWAYS test out your grand plans on a small scale first.
After two coats of the Acrylic glow-in-the-dark paint, I nearly died. My plan worked. It really worked! In fact, it worked so well, I decided to paint the sides of the stairs too. Since the paint dries nearly clear, after a few coats, it made the look of my Faux runner come to life, and made the stairs REALLY glow!!!
I am SOOOOOOOOOO Proud of myself. I never thought this would work so well, but it did. I love my basement stairs. Love them. One month ago, I had to wear shoes to go down them unscathed.
I'm going to add a few more coats, just to even it all out. But the bottom line is that the Acrylic Glow-in-the-dark paint works and wipes clean easily. And the saftey of glow-in-the-dark stars and railings is off the friggin charts.
If you have any questions about the process, please ask below in comments. This was a really fun, rewarding learning experience. I'm more than happy to help!


